CS110 Introduction to Computing
Laboratory Exercise 1
Tuesday, January 30, 2007
The Scribbler
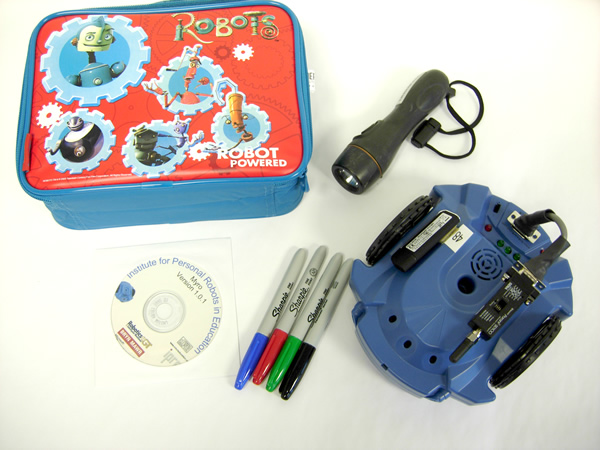
Today, you will get your Scribbler Robot Kit. Each kit contains the following items:
Make sure that all of these parts are present in your kit. If anything is missing, or you are having trouble identifying something, please call your instructor to help you.
Step 1. Number your Kit: Note the number assigned to your robot. You will find it on a small white sticker on top of the robot. This number is also present on the bluetooth antenna. Using the black marker pen provided, write down the same number on the bluetooth dongle, the flashlight, the two CDs, and the inside cover of the carrying case. Go ahead and do this before proceeding.
Step 2. Configure bluetooth dongle: Detach the bluetooth dongle from your robot (it is stuck using velcro tape) and remove its cap. Put the cap in a safe place in your carrying case. Locate an available USB port on your computer. The port may be in the front or on the back panel of the computer. Insert the bluetooth dongle into the USB port. Your computer will announce that it has found a new device. Open the Bluetooth Devices configuration window (you can do this by double clicking on the bluetooth logo on your computer screen (look in the bottom right hand corner). Alternately you may have to navigate to the Settings --> Control Panel -->Network Connections menu and select Bluetooth Devices. The following window should appear:
The window above shows the current bluetooth devices available. In the case above there are none. Next you will add a new bluetooth device to this. Go ahead and press your mouse on the ADD button.
You will get a window from the Add Bluetooth Device Wizard:
Do as directed above, turn the robot on, and make sure the checkbox is selected and then press the Next button. The following window will appear. Your computer is going to go looking for all the available bluetooth signals and report back whatever it finds. Below, you can see that it has found Scribbler-48.
Any other bluetooth devices available will also be displayed above. For example, if you are in the lab with other students, you will also see their robots. Locate the Scribbler by the number of your robot (above, the robot number was 48) and select it in the window above. Then press the Next button.
The next window that appears will ask for a passkey. This is shown below:
In the above window, select the "Use passkey found in the documentation" option, enter 1234 in the textbox and then press the Next button. The wizard will then configure your computer and the dongle to properly communicate with your Scribbler robot and report the following window:
Take a note of the "Outgoing COM port:" Above it is showing "COM10". You will need this information when you are ready to control your robot. Select Finish above and you will then get the window below showing that you have configured a bluetooth service to Scribbler-48 (it will show your robot's number).
Press OK and the device window will dissappear.
Step 3. Do Exercises 1 & 2 from Chapter 1 (The World of Robots) from TBNYN. You will give your robot a name, and then use the joystick operation to control the movements of your robot.
If you have more time in today's lab, try out Chapter Exercises 2 & 3 from Chapter 1 of TBNYN (look at the very end of the chapter). Remember that the markers supplied to you are permanent markers. Always ensure that when using permanent markers, you are using them on a sheet of paper (the lab will have ample supplies).
Each time you insert your bluetooth dongle into a computer, you will go through the above configuration steps to obtain the COM port number that you will use to establish a connection with the robot. Make sure you save this handout in your carrying case for future use.