CS 372: Artificial Intelligence
Robot Building Lab
Session 2
![]() Resource Kit
Resource Kit
![]() Outfitting A Robot Laboratory
Outfitting A Robot Laboratory
![]() Sample Syllabus for an
AI Course
Sample Syllabus for an
AI Course
![]() Robot Laboratory Handout
Robot Laboratory Handout
![]() Session 1
Session 1
![]() Session 3
Session 3
Find a MAC and extract the following items from your kit:
Next, we will connect the Handy Board to the MAC, and power it up!
The Handy Board requires two software components: A 6811 runtime library, and
the Interactive C application program. Both are provided on the Interactive C floppy
disk. The 6811 runtime routines are like a small operating system for the Handy Board.
They are normally pre-loaded on the Handy Board and reside there permanently. When
you turn the Handy Board ON, if the display on the Handy Board shows the following:
then we know that the 6811 runtime libraries are already pre-loaded. If you do not see the above display, you will have to download these libraries from your floppy. Here is what you will have to do:
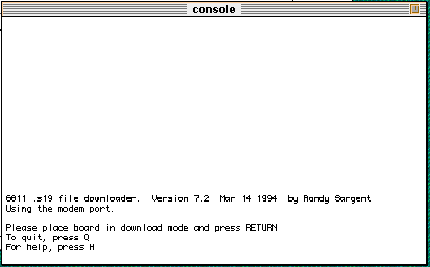
Find the application labeled Init board R2 7.2 Modem on your Interactive C floppy. Double click the application and you will get the following screen on your MAC:

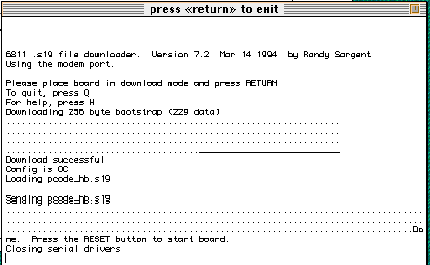
Turn OFF the power switch on the Handy Board. Turn it ON again while pressing the STOP button. This puts the Handy Board into bootstrap download mode. I.e. when you press the RETURN key on the MAC, the downloader will place the 6811 runtime system on the Handy Board. The downloader screen will show the following:

At this point, turn the Handy Board OFF and turn it back ON. You will now see
the Interactive C message:
Also, notice in the bottom right corner of the Handy Board screen, there is a blinking heart. A blinking heart indicates a healthy Handy Board. You may now exit the downloader application. Most likely you will not need to use it again. In case the contents of the Handy Board memory do get corrupted, you can follow the above steps to reload the 6811 runtime system.
Interactive C
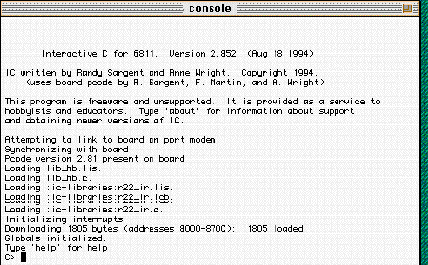
We are now ready to look at the second piece of software. One that will be used for programming agents controlled by the Handy Board. Find the Interactive C application on the floppy disk. It is named IC R2 2.852 modem. Double click on the application and you will see the following screen on your MAC:

In the above window, as a result of launching the application, the software first tries to make contact with the Handy Board. if the Handy Board is turned ON, it will synchronize with it. It will also load additional program libraries before giving the prompt (>C).
At the prompt, you can enter any valid Interactive C (IC, from now on) statement.
The application will translate the statement into code (pcode) that can then be executed
by the Handy Board. The results of the execution will be returned on the MAC screen,
or displayed on the Handy Board display, depending on the command issued. For example,
try entering the following IC statement:
The string in the printf message will be displayed on the Handy Board display.
Try typing the expression:
This statement will be compiled and then executed on the Handy Board and the result of the evaluation will be returned on the MAC screen. Both of these are shown below:

Interactive C is a little-sister version of C. Additionally, it comes with several useful, Handy Board specific, libraries containing procedures and functions that provide access to various Handy Board features. Over the next few sessions, we will spend most of our time familiarizing ourselves with these. For now, read the first 9 sections (pages 1 to 28) of the Interactive C manual.
Building An Embedded Agent
In Chapter 2 of Russell & Norvig's text you learned that an agent is anything that can perceive its environment and act upon it. This requires the agent to have some sensors for perception and some effectors for acting. In this lab, we will create mobile agents that are capable of moving about in their environments. From your last lab, you should now have a wheeled LEGO assembly (chassis) capable of carrying the Handy Board (the LEGO Bug, for instance). This assembly is powered by two motors. Today, we will connect these motors to the mounted Handy Board so that we can build agent programs that exhibit simple motion behaviors. You may assume, for this lab, that the environment of the agent will be a big flat surface without any obstacles. Let us start by connecting the motors.
Place the Handy Board on the chassis. Connect the two motor cables to the motors (if not done already). Plug the pin ends of the two motor cables onto two motor ports of the Handy Board. Jack up the chassis so that the wheels are off the ground. Let us first see how to run the motors through a C statement.
The motor ports are numbered 0 through 3. The Handy Board's library contains procedures
for controlling the motors. The command:
turns motor m on at speed p. There are typically seven speeds available ranging in values from -100 to 100. Negative numbers indicate a backward rotation and positive for forward motion. A value of 0 will turn the motor off.
Issue some motor commands to both the motors. Make sure that the motors go forward when you give them positive speeds. if the polarities are switched they will go in the opposite direction. Switch the pin connections and make sure the motors are configured properly.
Writing Procedures
In this section, we will learn to write short procedures and programs that control
the behavior of mobile agents. Here is a simple program:
void goForward(long Time) {
motor(LeftMotor, 100);
motor(RightMotor, 100);
msleep(Time);
alloff();
}
Before you enter this program, go to the Interactive C disk, open the IC-Libraries
folder and in it, create a new folder (say Agents). Open SimpleText, and enter the
above program. Save it in a file (say moves.c). Next, launch the IC application.
Turn the Handy Board ON, and at the IC prompt enter the command:
Your program will be loaded, compiled, and downloaded into the Handy Board's memory.
After this has been done successfully, you can issue a command to the agent as follows:
Observe the actions. You can also write a main procedure as follows:
A simple program that you can add to the moves.c file. Next load the file again. After the file is loaded, you may disconnect the RJ11 cable from the Handy Board, turn the Handy Board OFF, place the agent on a flat surface, and then turn the board ON. As soon as the board is turned ON, the main procedure is executed.
Exercises
Using two motors, you can program the agent to go forward or backward in a straight line, or turn going in the forward or backward directions. Write some IC procedures to make your agent go forward, backward, turn while going forward, and turn while going backward, etc. Here are some exercises to work on: